What are evacuation assembly maps?
Evacuation assembly maps are designed to show building occupants the safest location(s) to go to following a building evacuation.
An assembly area shows where safety officials and building occupants gather after a building evacuation.
It is highly recommended that you familiarize yourself with the assembly areas assigned to the buildings you frequent.
Why are there two maps?
Primary Evacuation Assembly Map locations indicate where building occupants should assemble during a planned evacuation (drill) or unplanned evacuation of the building. These locations are designed to be far enough from the building for safety, without causing undue inconvenience to building occupants with the hope of re-entering the building.
Secondary Evacuation Assembly Map locations are the areas where building occupants may be directed to go if a) Primary locations are inaccessible or unsafe; b) More distance is needed from the building for safety; and/or c) An extended assembly time is needed to account for building occupants and ensure everyone is safe.
You will be directed to head to the Secondary locations by your Building Emergency Response Coordinator (BERC), a university official, or a first responder.
However, you should always use your own judgement: the most important thing is that you are a safe distance away from a hazard inside a building or along an evacuation route. If you are not able to head to designated areas, please prioritize your own safety above anything else.
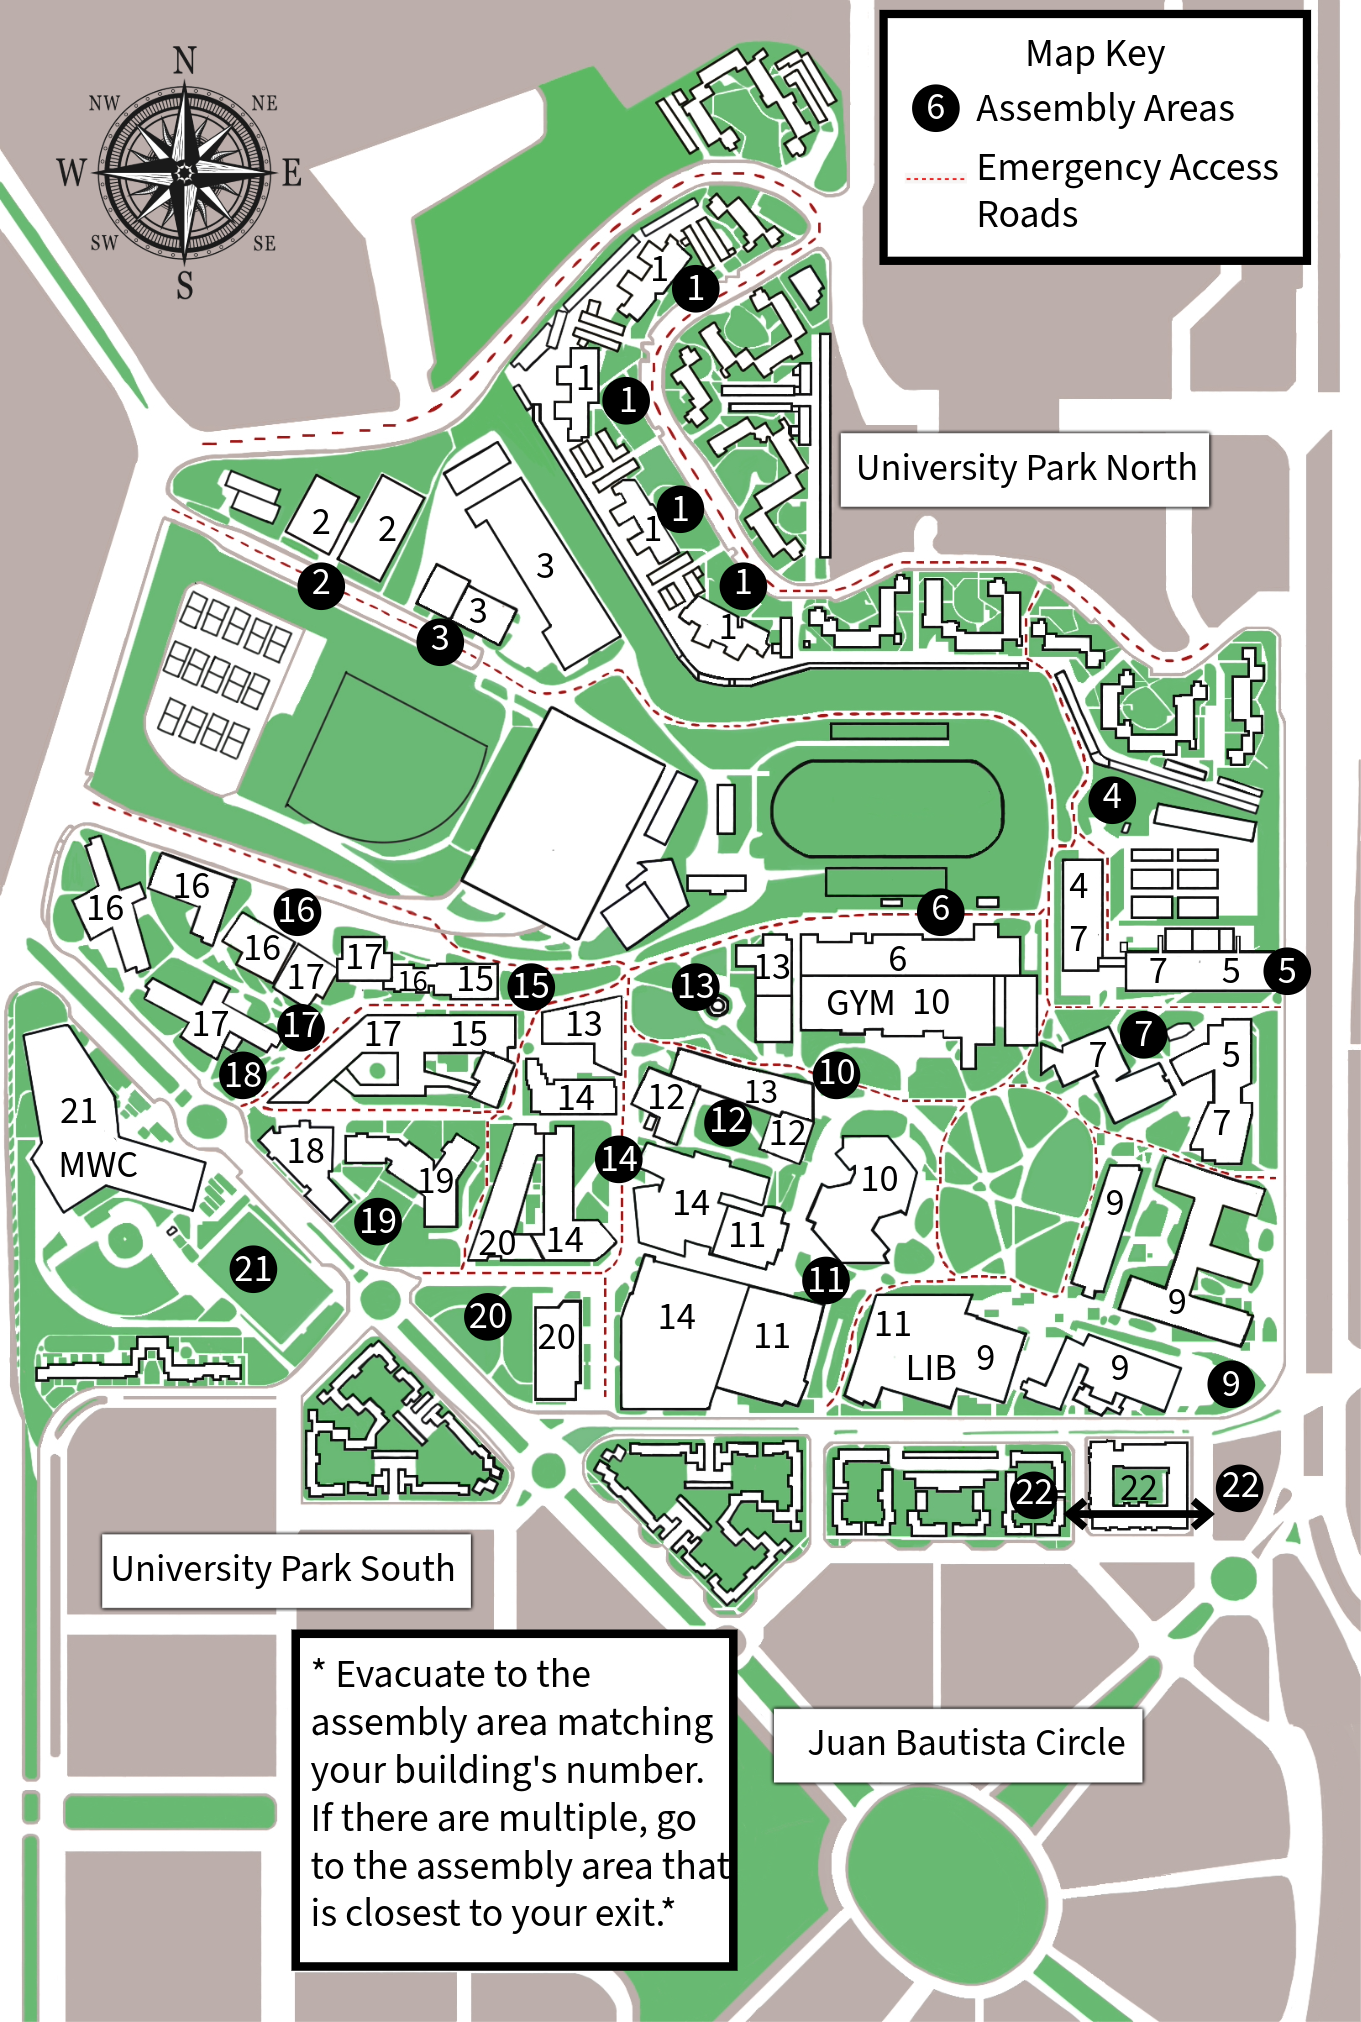
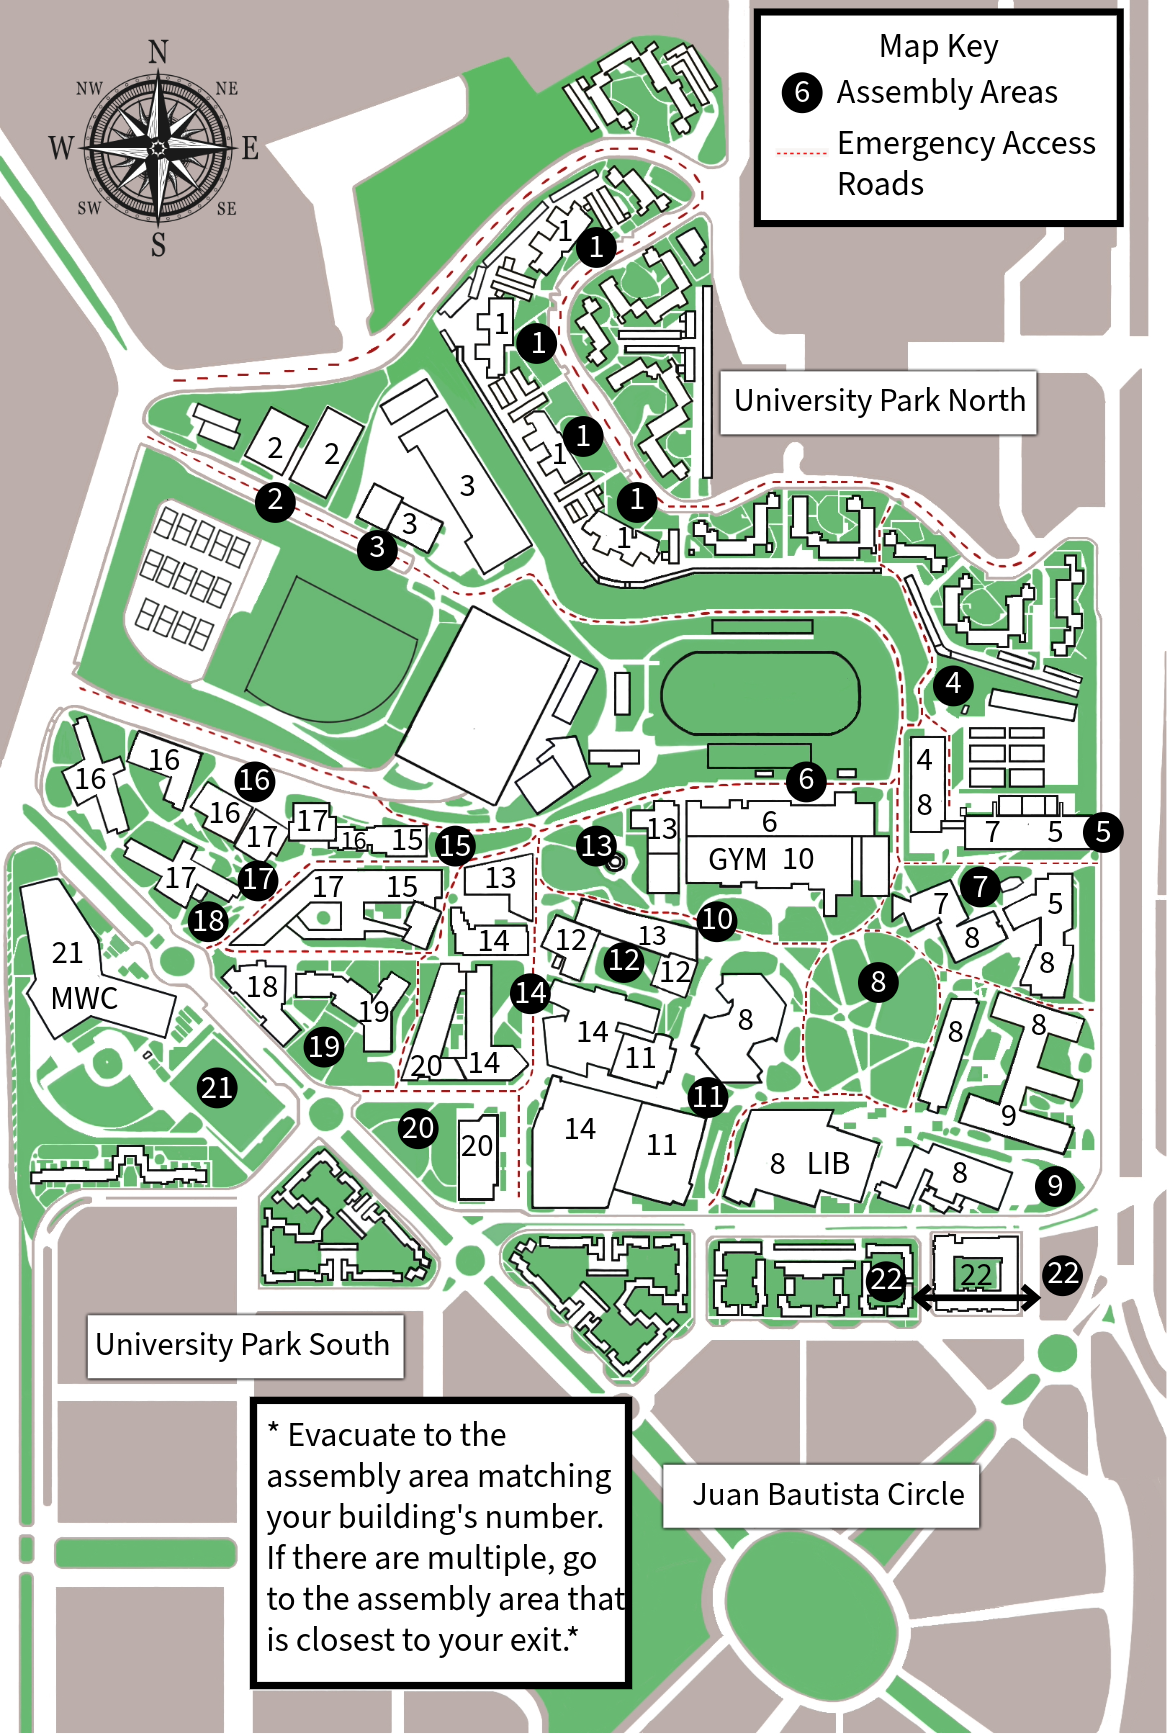
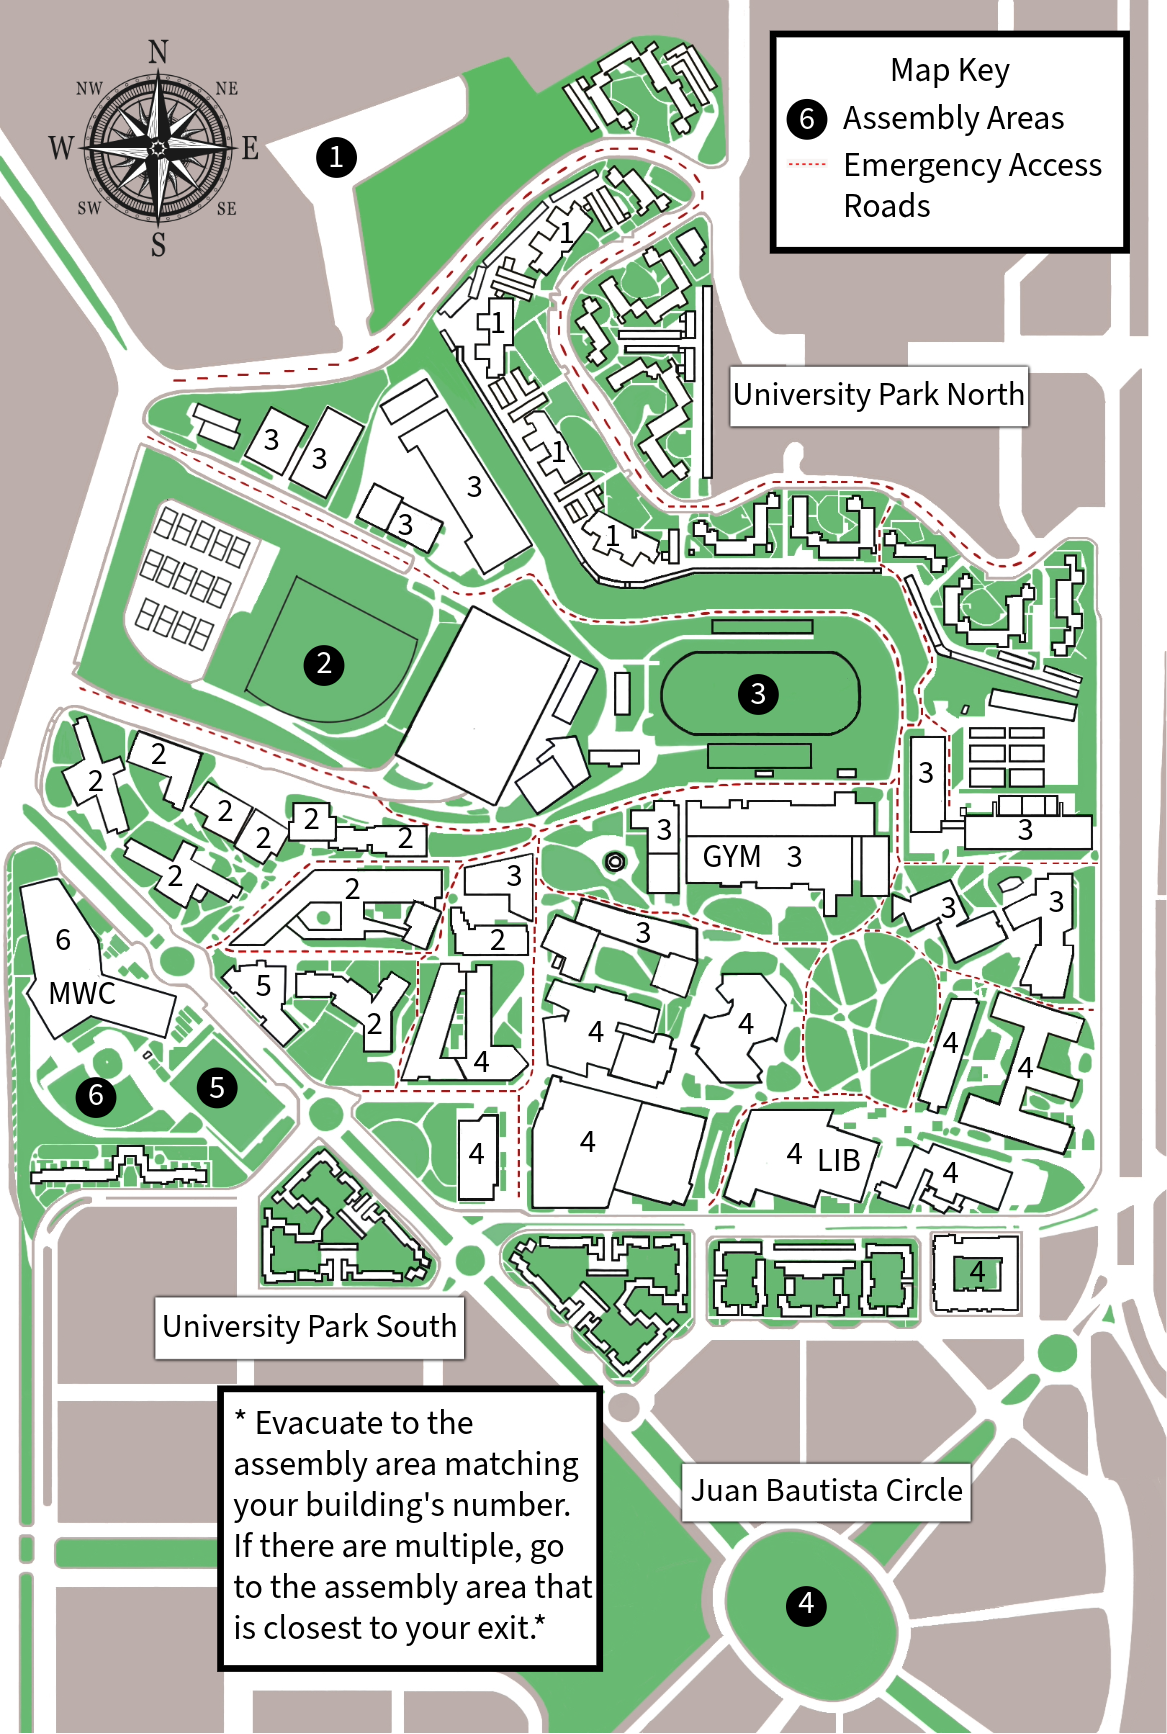
How do I read the maps?
Each building is labeled with a number that matches an assembly area (black circles with white numbers). That assembly area indicates the area to which that building will evacuate to in the event of an emergency. If a building has more than one assembly area, evacuate to the closest one.
If your primary assembly zones are unavailable or inaccessible, proceed to the designated secondary assembly areas.
There are also drop-down menus describing each building's evacuation assembly areas in text beneath each map.
IN AN EMERGENCY:
Find the building you are in on the map below.
Evacuate to the assembly area that matches the number in the building's outline.
Follow directions from authorities.
If you have more questions regarding evacuation maps or the BERC program, please contact the Office of Emergency Services at oes@sfsu.edu.
Primary Evacuation Assembly Map
Please refer to the Temporary Primary Evacuation Map in the drop down below from June 1st - August 31st 2026
Location(s) where building occupants should assemble during a planned evacuation (drill) or unplanned evacuation of the building.
|
Building Name |
Temporary Primary Evacuation Assembly Point (June 1st- August 31st 2026) |
| Administration | Area 9: The corner of 19th & Holloway |
| Annex 1 & Annex 2 | Area 2: The tree line directly across from the front of the buildings |
| Burk Hall | Areas 12/13: In the memorial garden in the courtyard of Burk/ The area above the atrium, to the west of the Ethnic Studies & Psychology Building |
| Business | Area 9: The corner of 19th & Holloway |
| Corporation Yard | Area 3: The tree line directly across the front of the buildings |
| Creative Arts | Areas 11/14: In between the Student Center and Creative Arts/ In the pathway between Marcus Hall and Creative Arts |
| Ethnic Studies & Psychology | Area 13: The area above the atrium, to the west of the Ethnic Studies & Psychology Building |
| Fine Arts | Area 11/14: In between the Student Center and Creative Arts/ In the pathway between Marcus Hall and Creative Arts |
| Greenhouse | Area 4: West of the Greenhouse |
| Gymnasium (GYM) | Areas 6/10: In the parking lot North of the Gym towards Cox Stadium/ The lawn of south of Gym |
| Gator Health Center | Area 18: To the Northwest lawn in next to Mary Park Hall |
| Hensill Hall | Areas 4/ 5/ 7: If on the first floor, head to the area west of Greenhouse / The sidewalk next to 19th Avenue to the East of Hensill Hall / the loading area north of the Science building. |
| Housing Office | Area 17: The area in the South of Monarca Dining Hall |
| HSS | Area 9: the Corner of 19th & Holloway |
| Humanities | Areas 14/ 20: In the pathway between Humanities and the Student Center / the lawn west of Burk Hall. |
| J. Paul Leonard Library (LIB) | Area 11: In between the Student Center and Creative Arts |
| Monarca Dining Hall | Area 17: The area south of Monarca Dining Hall between Mary Ward Hall |
| Manzanita Square | Areas 22: In front of Parkmerced Center for Electronic Business / University Park South Block 5 |
| Marcus Hall | Area 20: The lawn west of Marcus Hall |
| Mary Park Hall | Area 16: Lot 19 parking north of Monarca Dining Hall and Seven Hills Center |
| Mary Ward Hall | Area 17: Area south of Monarca Dining Hall and between Mary Ward Hall |
| Mashouf Wellness Center | Area 21: The Soccer Field southeast of Mashouf Wellness Center |
| Science | Areas 7: Loading dock to the north of Science Building |
| Science & Engineering Innovation Center (SEIC) | Areas 5/7: The sidewalk next to 19th Avenue to the East of Hensill Hall / Loading dock to the north of Science Building |
| Seven Hills Center | Area 16: Lot 19 parking north of Monarca Dining Hall and Seven Hills Conference Center |
| Student Center | Area 10: the lawn of south of Gym |
| Student Services Building | Area 13: The area above the atrium, to the west of the Ethnic Studies & Psychology Building |
| Temporary Buildings (Trailers) | Area 4: West of the Greenhouse |
| Thornton Hall | Areas 4/ 7: West of the Greenhouse / Loading dock to the north of the Science Building |
| The Towers at Centennial Square | Areas 15/16/17: The area between the Towers Conference Center, Village B, and Student Services Building / Lot 19 parking north of the Monarca Dining Hall and Seven Hills Conference Center / The area south of Monarca Dining Hall, between Mary Ward Hall |
| Towers Conference Center | Areas 16/17: Lot 19 parking north Monarca Dining Hall and Seven Hills Conference Center / The area south of Monarca Dining Hall, between Mary Ward Hall |
| University Park North | Areas 1: The lawn in front of each respective building |
| Village A (Village at Centennial Square) | Area 17: Area south of Monarca Dining Hall and between Mary Ward Hall |
| Village B (Village at Centennial Square) | Area 15: The area between the Towers Conference Center, Village B, and Student Services Building |
| Village C (Village at Centennial Square) | Area 14: The pathway between Village C and Fine Arts |
| West Grove Commons | Area 19: The lawn south of West Grove Commons |
| Yerba Buena Dining Hall | Area 19: The lawn south of West Grove Commons |
|
Building Name |
Primary Evacuation Assembly Point |
| Administration | Area 8: Quad |
| Annex 1 & Annex 2 | Area 2: The tree line directly across from the front of the buildings |
| Burk Hall | Areas 12/13: In the memorial garden in the courtyard of Burk/ The area above the atrium, to the west of the Ethnic Studies & Psychology Building |
| Business | Area 8: Quad |
| Corporation Yard | Area 3: The tree line directly across the front of the buildings |
| Creative Arts | Areas 11/14: In between the Student Center and Creative Arts/ in the pathway between Marcus Hall and Creative Arts |
| Ethnic Studies & Psychology | Area 13: The area above the atrium, to the west of the Ethnic Studies & Psychology Building |
| Fine Arts | Area 11/14: In between the Student Center and Creative Arts/ In the pathway between Marcus Hall and Creative Arts |
| Greenhouse | Area 4: West of the Greenhouse |
| Gymnasium (GYM) | Areas 6/10: In the parking lot North of the Gym towards Cox Stadium, the lawn of south of Gym |
| Gator Health Center | Area 18: To the Northwest lawn in next to Mary Park Hall |
| Hensill Hall | Areas 4/5/7: If on the first floor, head to the area west of Greenhouse / The sidewalk next to 19th Avenue to the East of Hensill Hall / the loading area north of the Science building. |
| Housing Office | Area 17: The area in the South of Monarca Dining Hall |
| HSS | Areas 8/9: Quad / the Corner of 19th & Holloway |
| Humanities | Areas 14/20: In the pathway between Humanities and the Student Center / the lawn west of Burk Hall. |
| J. Paul Leonard Library (LIB) | Area 8: Quad |
| Monarca Dining Hall | Area 17: The area south of Monarca Dining Hall between Mary Ward Hall |
| Manzanita Square | Areas 22: In front of Parkmerced Center for Electronic Business / University Park South Block 5 |
| Marcus Hall | Area 20: The lawn west of Marcus Hall |
| Mary Park Hall | Area 16: Lot 19 parking north of Monarca Dining Hall and Seven Hills Center |
| Mary Ward Hall | Area 17: Area south of Monarca Dining Hall and between Mary Ward Hall |
| Mashouf Wellness Center | Area 21: The Soccer Field southeast of Mashouf Wellness Center |
| Science | Areas 7/8: Loading dock to the north of Science Building / Quad |
| Science & Engineering Innovation Center (SEIC) | Areas 5/7: The sidewalk next to 19th Avenue to the East of Hensill Hall / Loading dock to the north of Science Building |
| Seven Hills Center | Area 16: Lot 19 parking north of Monarca Dining Hall and Seven Hills Conference Center |
| Student Center | Area 8: Quad |
| Student Services Building | Area 13: The area above the atrium, to the west of the Ethnic Studies & Psychology Building |
| Temporary Buildings (Trailers) | Area 4: West of the Greenhouse |
| Thornton Hall | Areas 4/8: West of the Greenhouse / Quad |
| The Towers at Centennial Square | Areas 15/16/17: The area between the Towers Conference Center, Village B, and Student Services Building / Lot 19 parking north of the Monarca Dining Hall and Seven Hills Conference Center / The area south of Monarca Dining Hall, between Mary Ward Hall |
| Towers Conference Center | Areas 16/17: Lot 19 parking north Monarca Dining Hall and Seven Hills Conference Center / The area south of Monarca Dining Hall, between Mary Ward Hall |
| University Park North | Areas 1: The lawn in front of each respective building |
| Village A (Village at Centennial Square) | Area 17: Area south of Monarca Dining Hall and between Mary Ward Hall |
| Village B (Village at Centennial Square) | Area 15: The area between the Towers Conference Center, Village B, and Student Services Building |
| Village C (Village at Centennial Square) | Area 14: The pathway between Village C and Fine Arts |
| West Grove Commons | Area 19: The lawn south of West Grove Commons |
| Yerba Buena Dining Hall | Area 19: The lawn south of West Grove Commons |
Secondary Evacuation Assembly Map
Location(s) where building occupants may be directed to go if a) Primary locations are inaccessible or unsafe; b) More distance is needed from the building for safety; and/or c) An extended assembly time is needed to account for building occupants and ensure everyone is safe.
You will be directed to head to the Secondary locations by your Building Emergency Response Coordinator (BERC), a university official, or a first responder.
|
Building Name |
Secondary Evacuation Assembly Point |
| Administration | Area 4; Juan Bautista Circle, South of University Park South |
| Annex 1 & Annex 2 | Area 3; Cox Stadium, Football Stadium east of the Corporation Yard and Parking Garage |
| Burk Hall | Area 3; Cox Stadium, Football Stadium east of the Parking Garage |
| Business | Area 4; Juan Bautista Circle, South of University Park South |
| Corporation Yard | Area 3; Cox Stadium, Football Stadium east of the Corporation Yard and Parking Garage |
| Creative Arts | Area 4; Juan Bautista Circle, South of University Park South |
| Ethnic Studies & Psychology | Area 3; Cox Stadium, Football Stadium east of the Parking Garage |
| Fine Arts | Area 4; Juan Bautista Circle, South of University Park South |
| Greenhouse | Area 3; Cox Stadium, Football Stadium west of the Greenhouses |
| Gymnasium (GYM) | Area 3; Cox Stadium, Football Stadium north of the Gym |
| Gator Health Center | Area 5, Soccer Field across the street and next to Mashouf Wellness Center |
| Hensill Hall | Area 3; Cox Stadium, Football Stadium west of Hensill Hall |
| Housing Office | Area 2; Maloney Field, Baseball field to the North and next to the parking garage |
| HSS | Area 4; Juan Bautista Circle, South of University Park South |
| Humanities | Area 4; Juan Bautista Circle, South of University Park South |
| J. Paul Leonard Library (LIB) | Area 4; Juan Bautista Circle, South of University Park South |
| Monarca Dining Hall | Area 2; Maloney Field, Baseball field to the North and next to the parking garage |
| Manzanita Square | Areas 4; Juan Bautista Circle, South of University Park South |
| Marcus Hall | Area 4; Juan Bautista Circle, South of University Park South |
| Mary Park Hall | Area 2; Maloney Field, Baseball field to the North and next to the parking garage |
| Mary Ward Hall | Area 2; Maloney Field, Baseball field to the North and next to the parking garage |
| Mashouf Wellness Center | Area 6: The Soccer Field southeast of Mashouf Wellness Center |
| Science | Area 3; Cox Stadium, Football Stadium northwest of Science |
| Science & Engineering Innovation Center (SEIC) | Area 3; Cox Stadium, Football Stadium northwest of SEIC |
| Seven Hills Conference Center | Area 2; Maloney Field, Baseball field to the North and next to the parking garage |
| Student Services Building | Area 3; Cox Stadium, Football Stadium northeast of Student Services |
| Temporary Buildings (Trailers) | Area 3; Cox Stadium, Football Stadium west of the Temporary Buildings |
| Thornton Hall | Areas 3; Cox Stadium, Football Stadium west of Thornton Hall |
| The Towers at Centennial Square | Area 2; Maloney Field, Baseball field to the North and next to the parking garage |
| Towers Conference Center | Areas 2; Maloney Field, Baseball field to the North and next to the parking garage |
| University Park North | Area 1; SFSU Parking Lot 25 |
| Village A (Village at Centennial Square) | Area 2; Maloney Field, Baseball field to the North and next to the parking garage |
| Village B (Village at Centennial Square) | Area 2; Maloney Field, Baseball field to the North and next to the parking garage |
| Village C (Village at Centennial Square) | Area 2; Maloney Field, Baseball field to the North and next to the parking garage |
| West Grove Commons | Area 2; Maloney Field, Baseball field to the North and next to the parking garage |
| Yerba Buena Dining Hall | Area 2; Maloney Field, Baseball field to the North and next to the parking garage |